
How to Build a Personalized Email Invitation Sequence (With Reminders That Stop on Their Own)
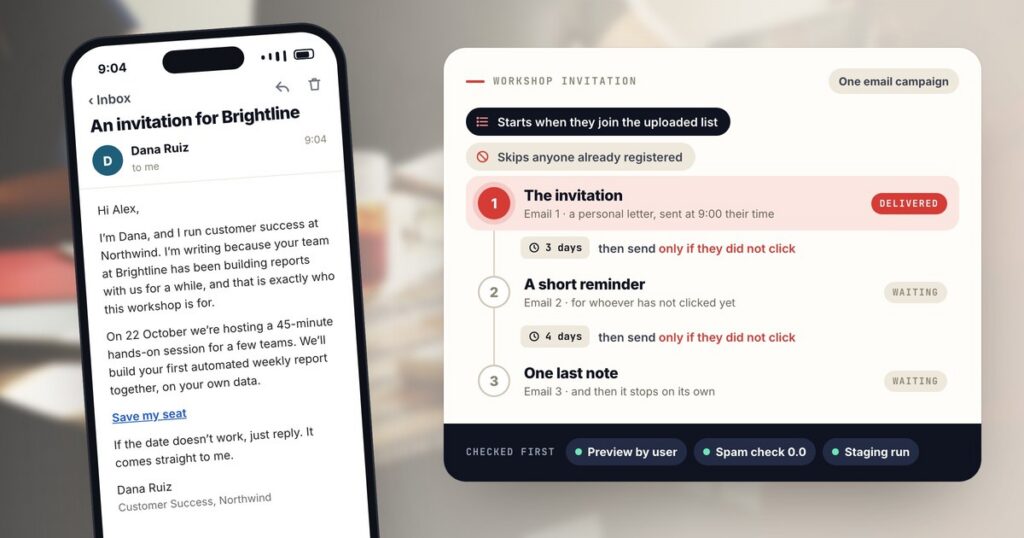
An invitation that works is rarely the first email. It is the first email, a short reminder a few days later for the people who did not act, and one last note after that — each one written to the person, and each one stopping the moment they say yes. Sent to a list you already have, it is one of the most useful campaigns there is: an event, a beta, a review, a renewal, an account somebody should claim.
Below is how to build that in Personyze, step by step, on a real campaign: we used exactly this setup for one of our own invitations, to a few hundred people. The names, addresses and wording in the pictures have been replaced with a made-up workshop invitation from “Dana at Northwind”; the settings are the real ones. The checks before sending get the most space, because that is where an invitation sequence is won or lost.
To see what each person on the list actually receives — including the one who clicked, the one who already registered and the one with no first name — open the invitation sequence example.
- Upload the list, with your own columns
- Target the list, and exclude whoever already said yes
- Write a personal letter, not a newsletter
- Put a fallback on every variable
- Turn one email into three
- Send it as a person, and count the replies
- Pace it
- Check everything before it goes out
- Publish, and read the results
1. Upload the list, with your own columns
Start with a CSV: one row per person, an email address, and any column you will want to print in the email — first name, company, a personal link. Upload it under Imported user data › New import. Personyze reads the header row and suggests a profile field for each column; for a column that is yours alone, pick Create a field for this column, and it becomes a field like any other. Nothing is imported until you confirm the mapping.
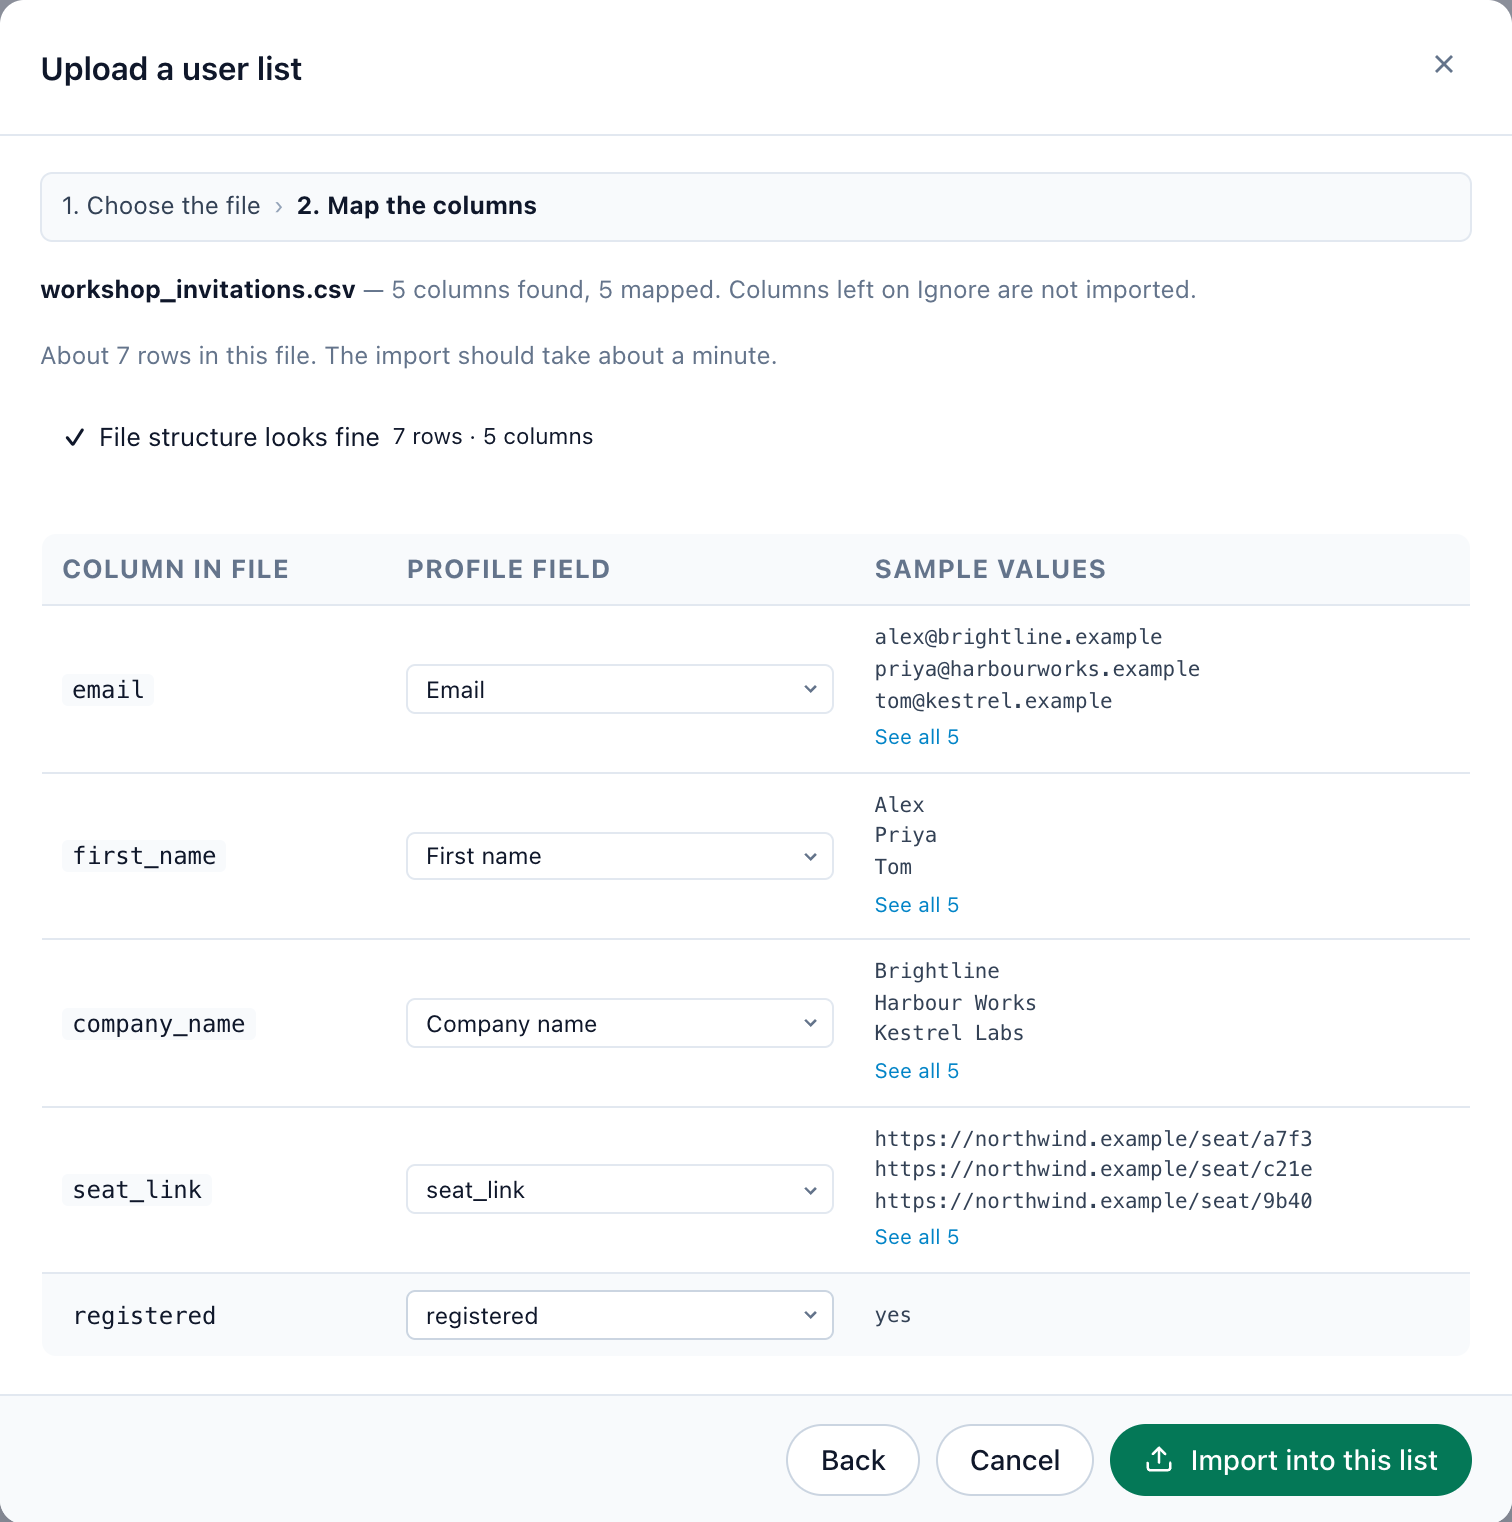
seat_link (a personal link per person) and registered become custom fields. Every column you keep can be printed in the email later.Add a column for the thing you are asking people to do — here, registered — even if it is empty for now. Fill it in later from your own system, an integration or a re-upload, and the sequence will use it to stop.
2. Target the list, and exclude whoever already said yes
In the campaign’s Target step, the first rule is simply User Lists → in <your list>. The second is the one that makes the reminders polite: an Exclude rule on the field that marks people who have already done what you asked. The Audience story under the rules says it back in one sentence, so you can check the logic without reading the rules twice.
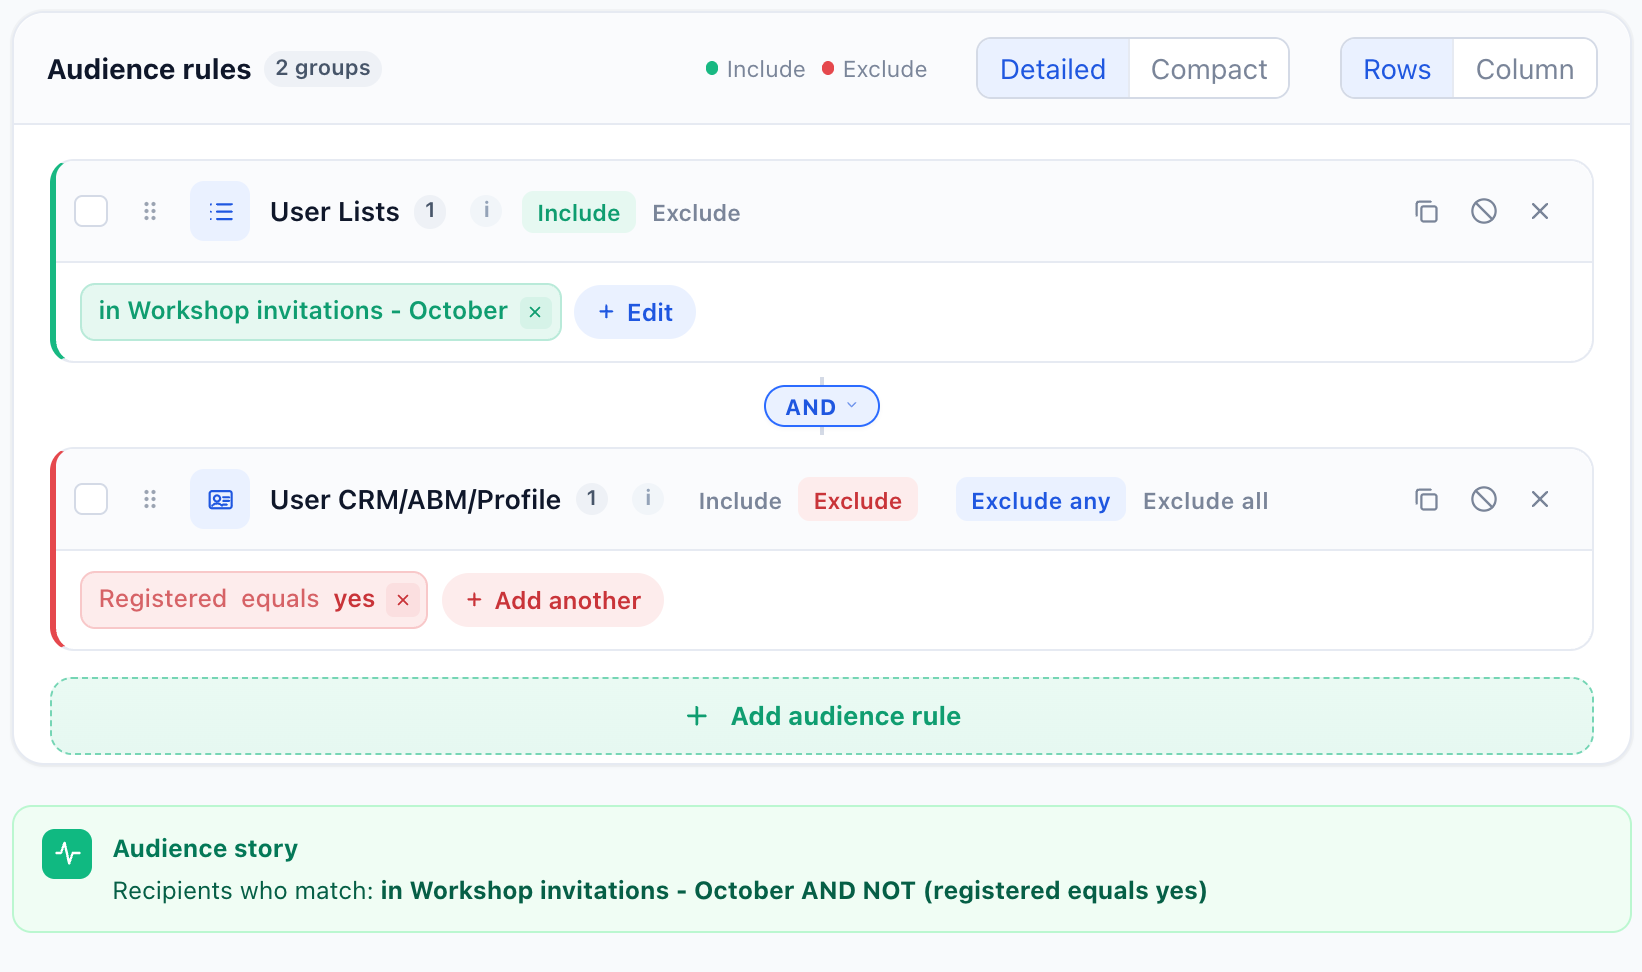
registered field equals yes.The audience is checked again each time an email is due, not once at the start. Somebody who registers after the invitation simply never gets the reminders.
3. Write a personal letter, not a newsletter
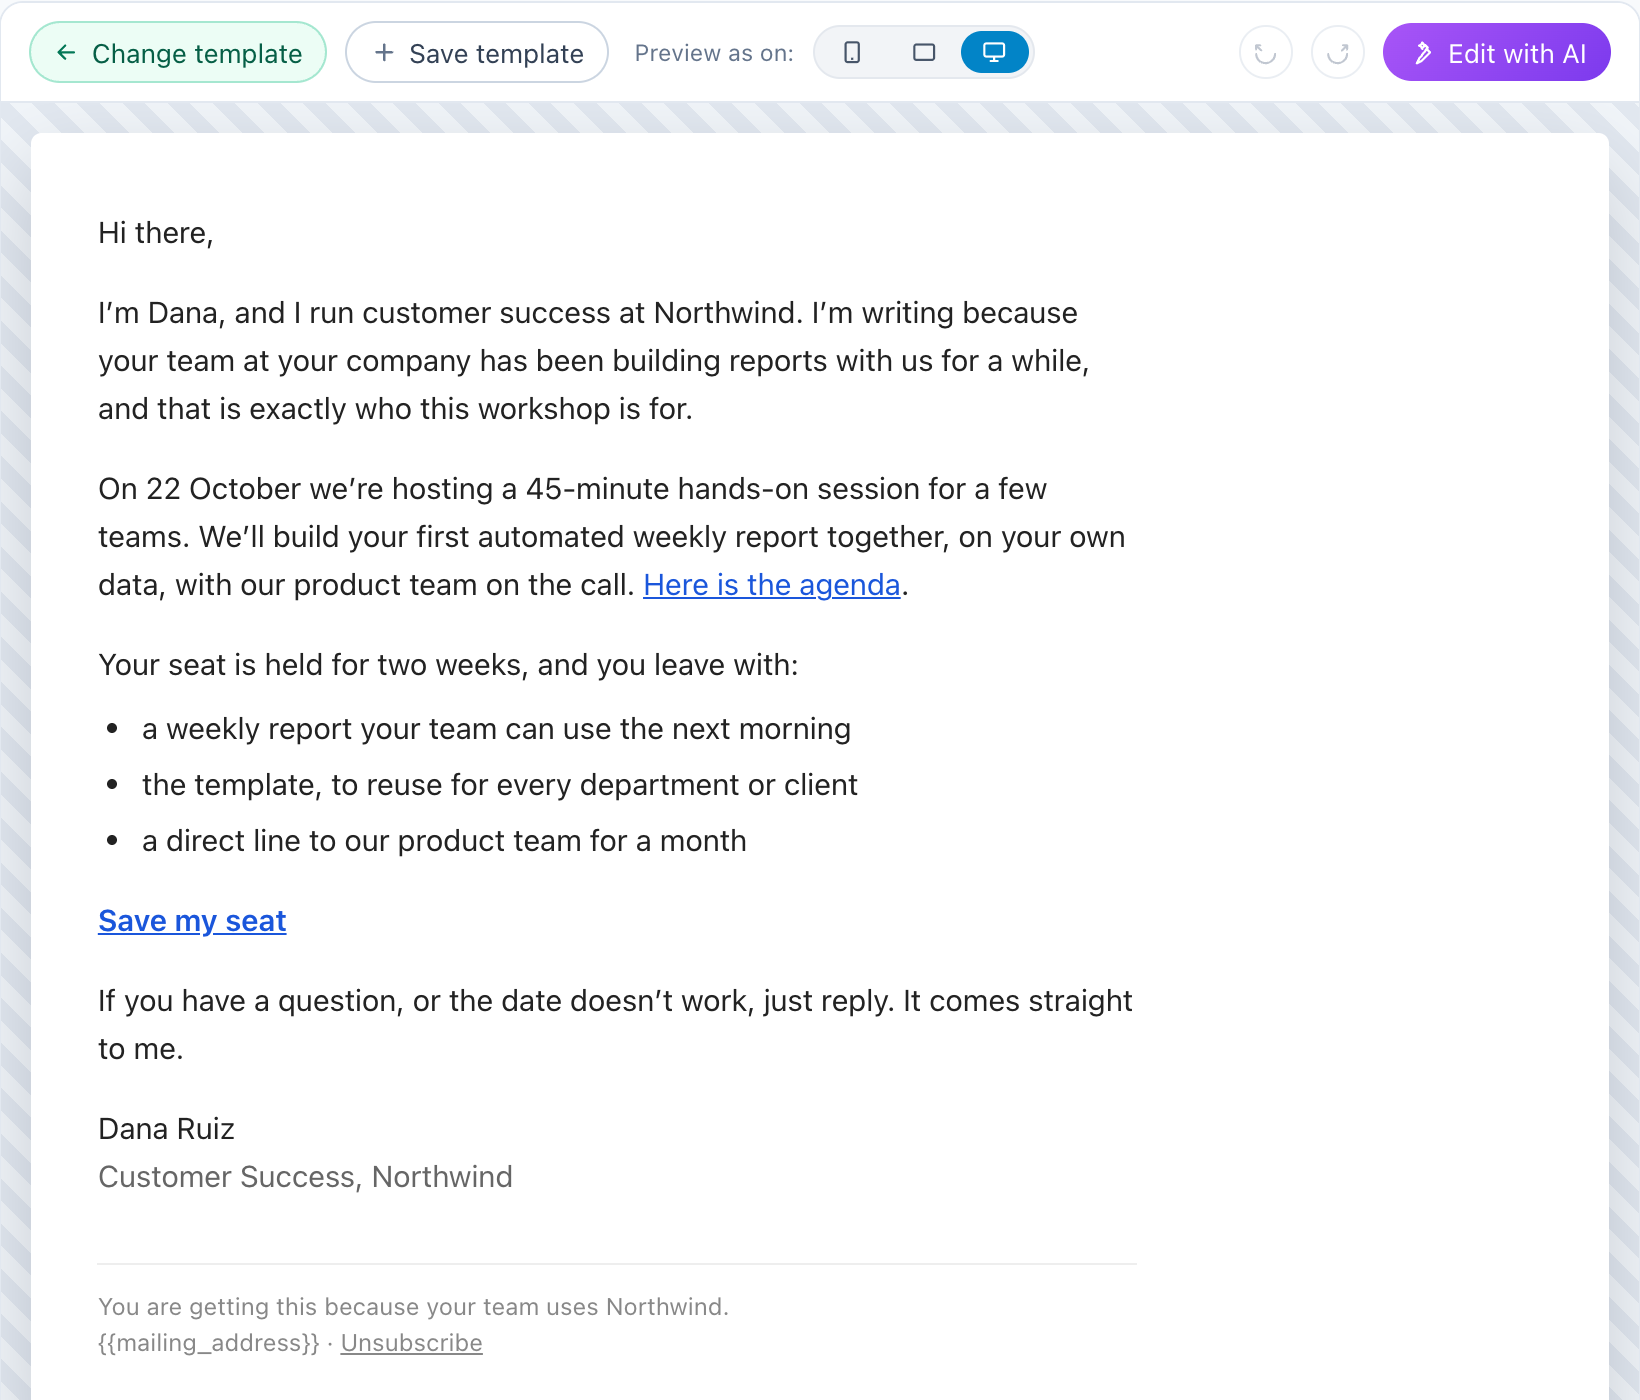
An invitation from a person should look like it came from a person: plain text, the sender’s own name and signature, links in the text rather than big buttons, no header banner. It reads as a one-to-one note, it is more likely to land in the main inbox than in the promotions tab, and it gets replies — which, for an invitation, is often the best outcome there is.
4. Put a fallback on every variable
Any field you uploaded can be printed into the subject, the preheader or the body. Give each one a fallback, so a person with an empty field never gets a hole in the sentence (“Hi ,”):
Hi ${first_name:default('there')},
An invitation for ${company_name:default('your company')}
<a href="${seat_link:default('https://northwind.example/workshop/')}">Save my seat</a>
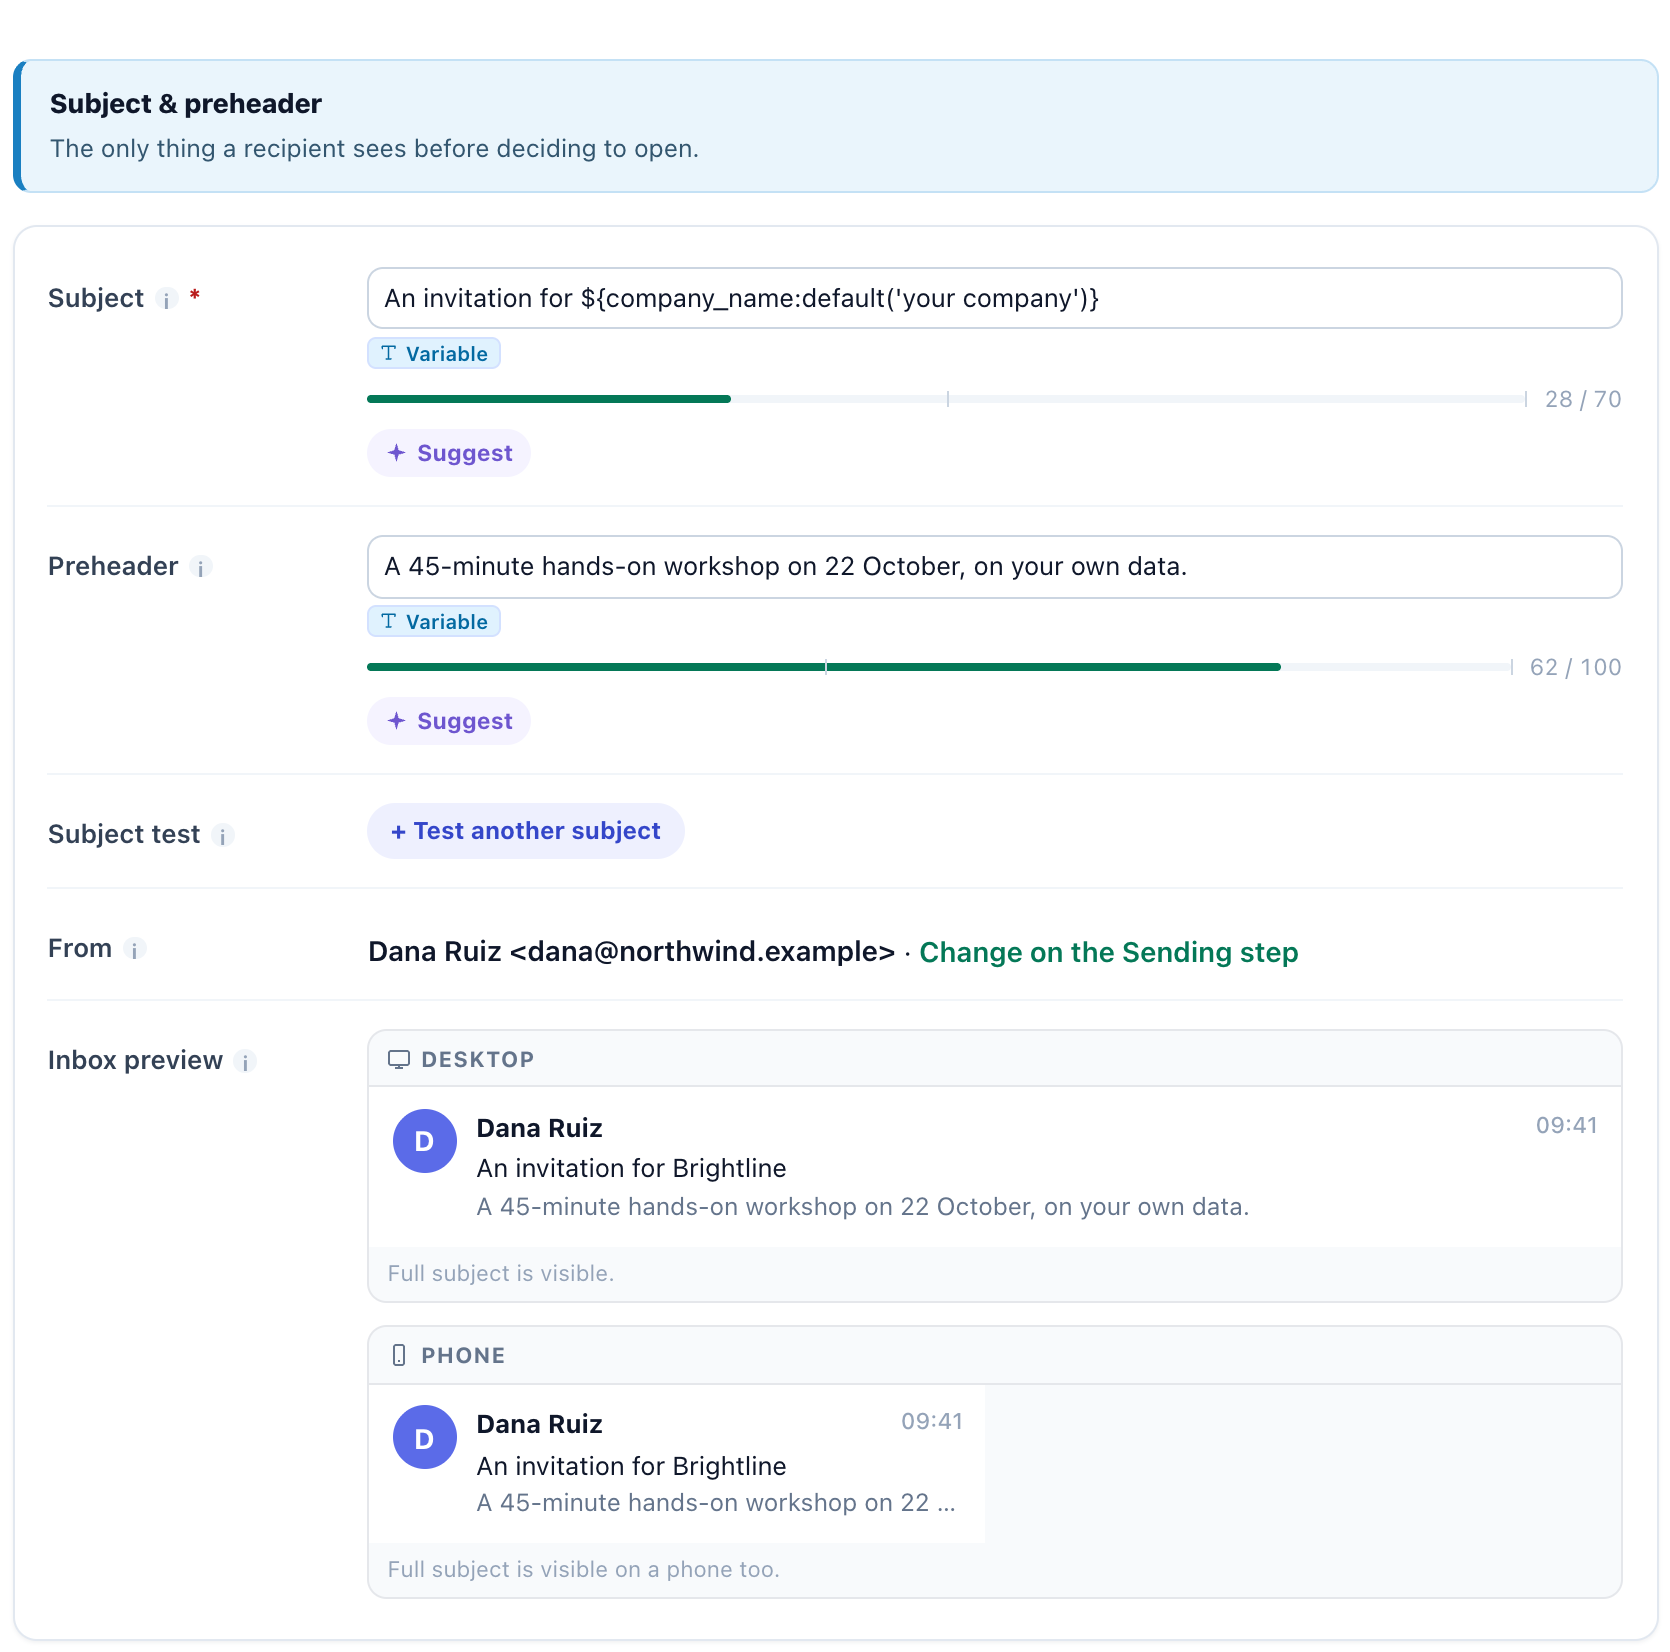
More on writing and testing both lines in the subject line and the preheader.
5. Turn one email into three
In the Content step, the first email starts when someone joins the audience — for an uploaded list, that is straight away. Add a step for each reminder, then set how long it waits after the email before it and who gets it: Always, only those who didn’t open it, only those who opened it, or a sharper rule from the list — here, only if they did not click in it.
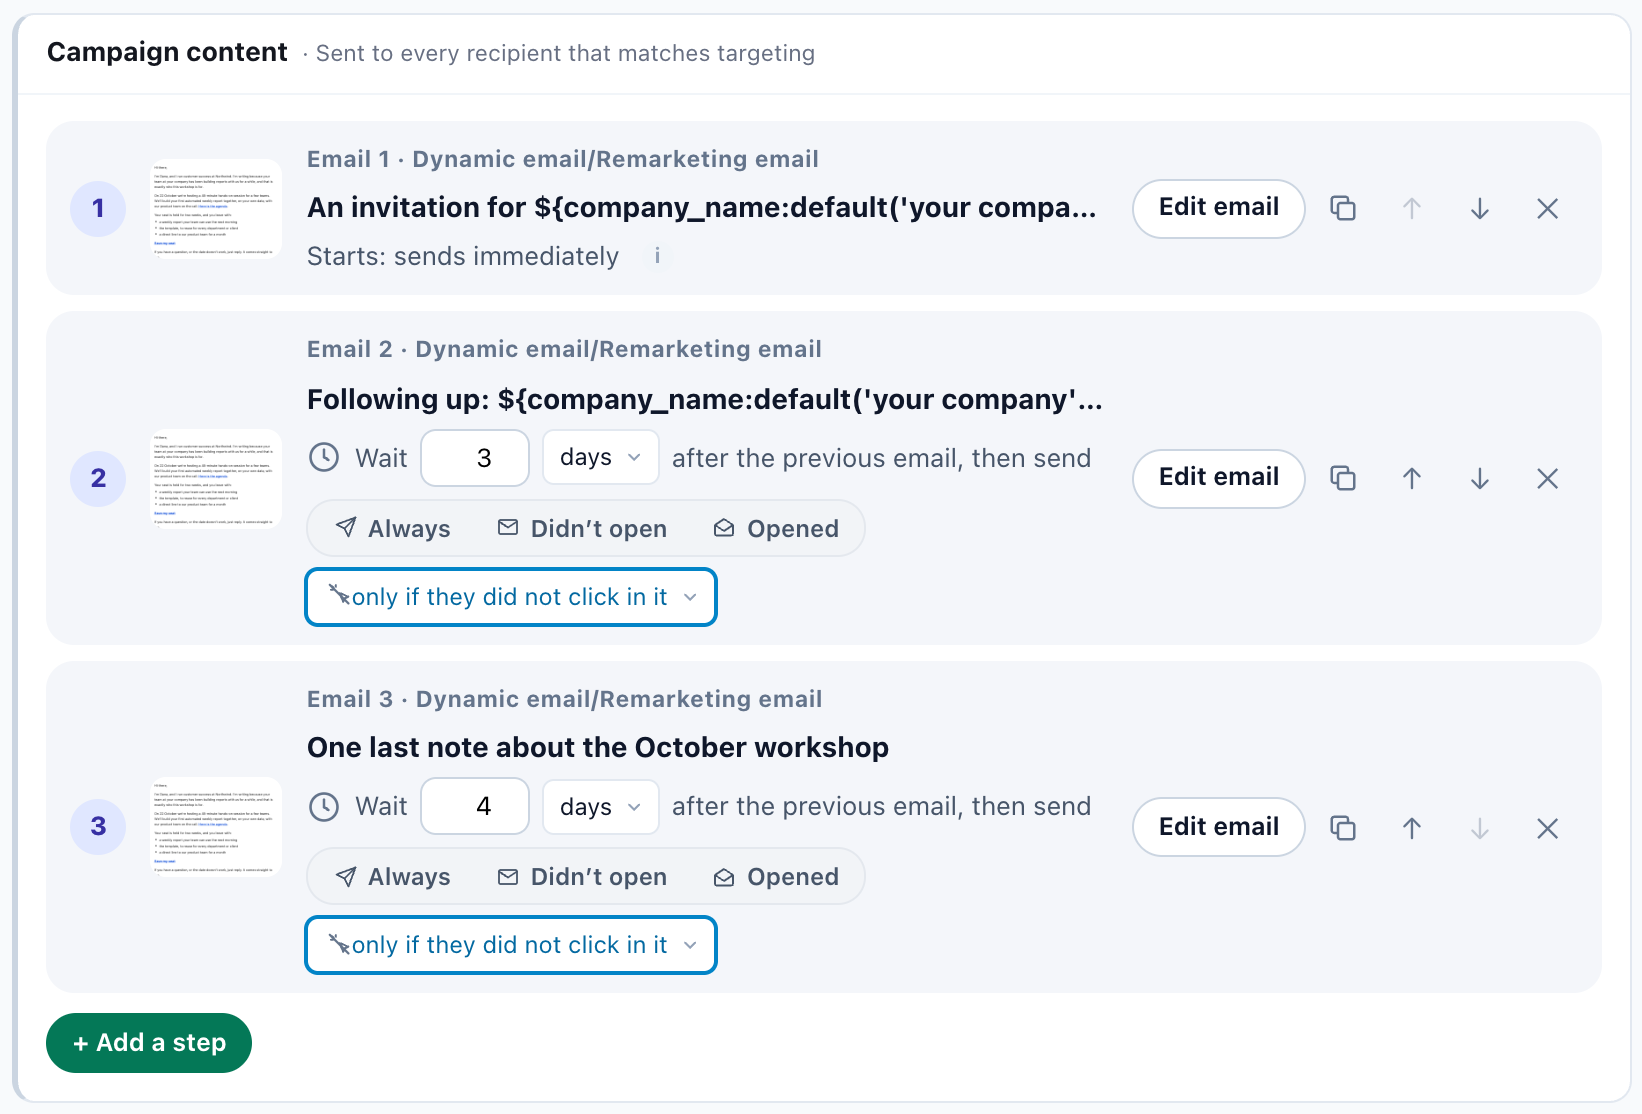
Clicking is a better test than opening: many mail apps open every message they download, so “opened” does not always mean read. Combined with the Exclude rule from step 2, the reminders stop for anyone who clicked or already registered. For planning longer sequences, see email sequences that know when to stop.
6. Send it as a person, and count the replies
The Sending step decides who each email is from and where replies go. Use a real person’s name on a verified address, set the Reply-To, and switch on Track replies: replies are counted in the report and still reach you. The account-wide parts — your sending domain, the mailing address and the unsubscribe page that every email’s footer uses — are set once and shared by every campaign.
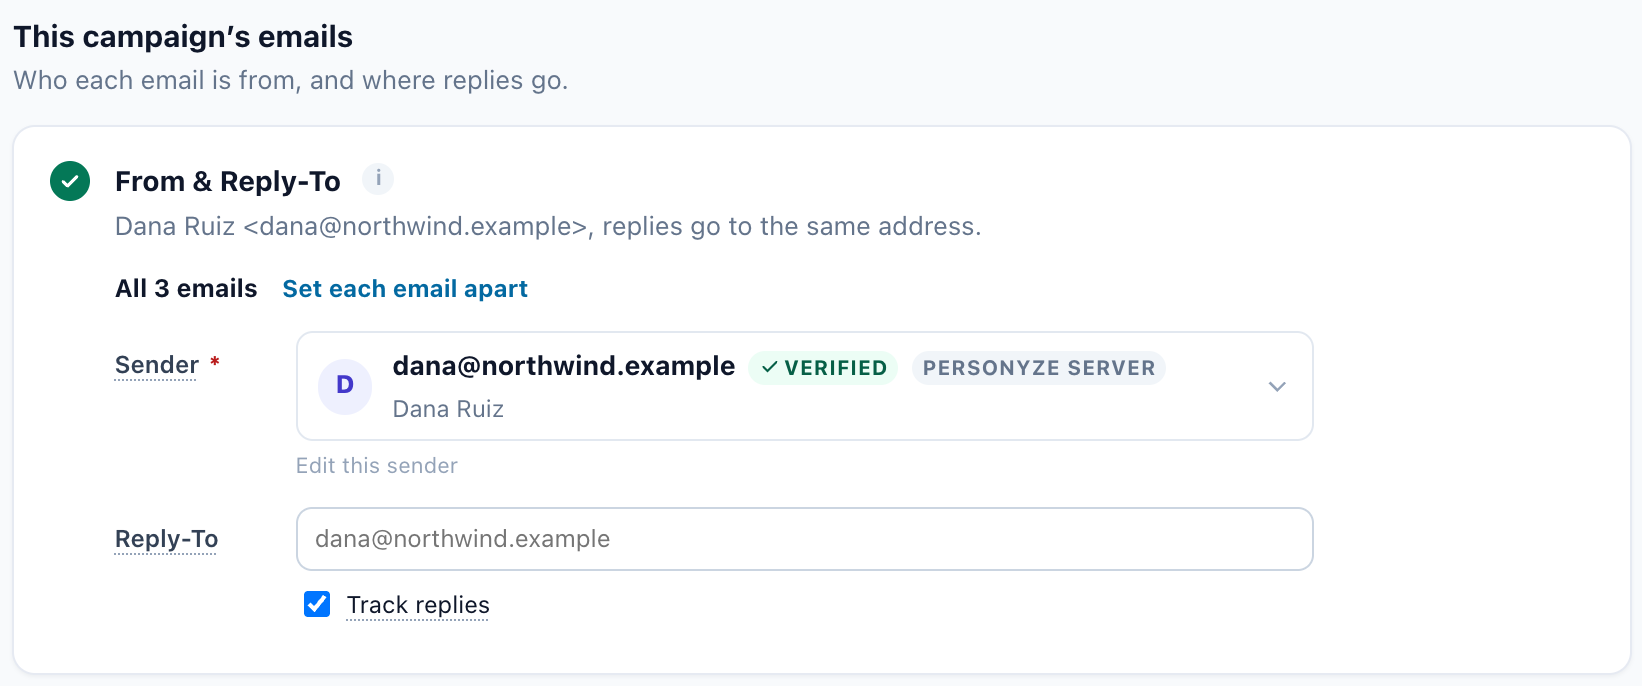
Sending from your own domain, signed with DKIM, makes a real difference to where your email lands; it is covered in send email from your own domain.
7. Pace it
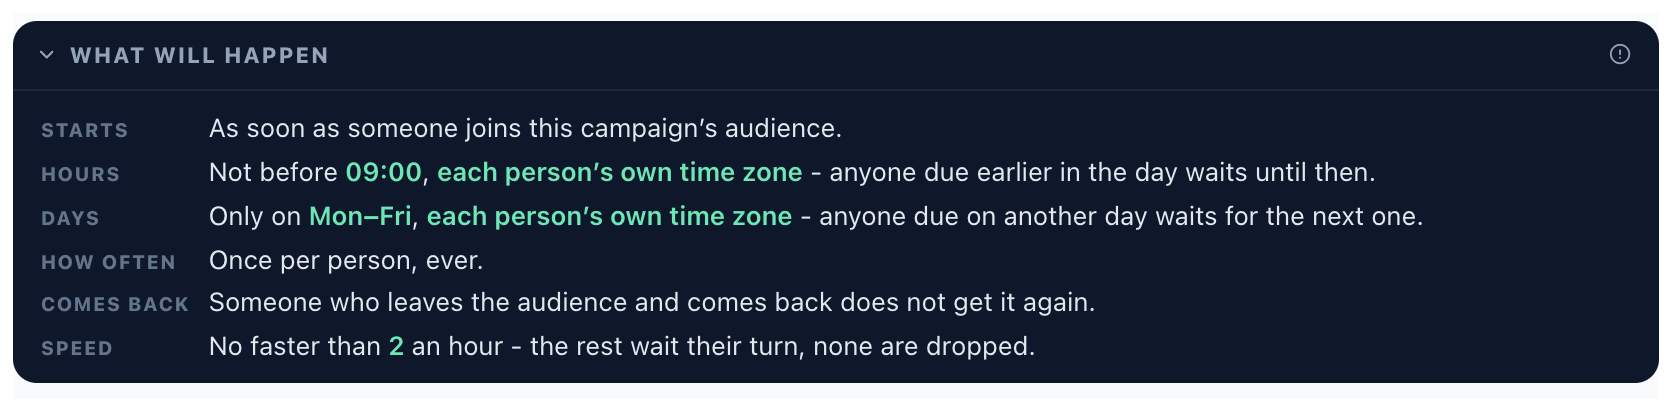
Each email’s Timing tab decides when it may go. For an invitation, three settings matter: Hour of day — not before 09:00; Time zone — each person’s own, so nobody in another country gets it at 3 a.m.; and Days of week — Monday to Friday. Then a Send speed limit: a sender that rarely sends should not fire a few hundred emails at once, and a slow start leaves you time to stop if bounces appear.
8. Check everything before it goes out
The QA step is where you find the email that says “Hi ,”, the broken link and the subject that trips a spam filter — before your list does.
Preview it as one real person
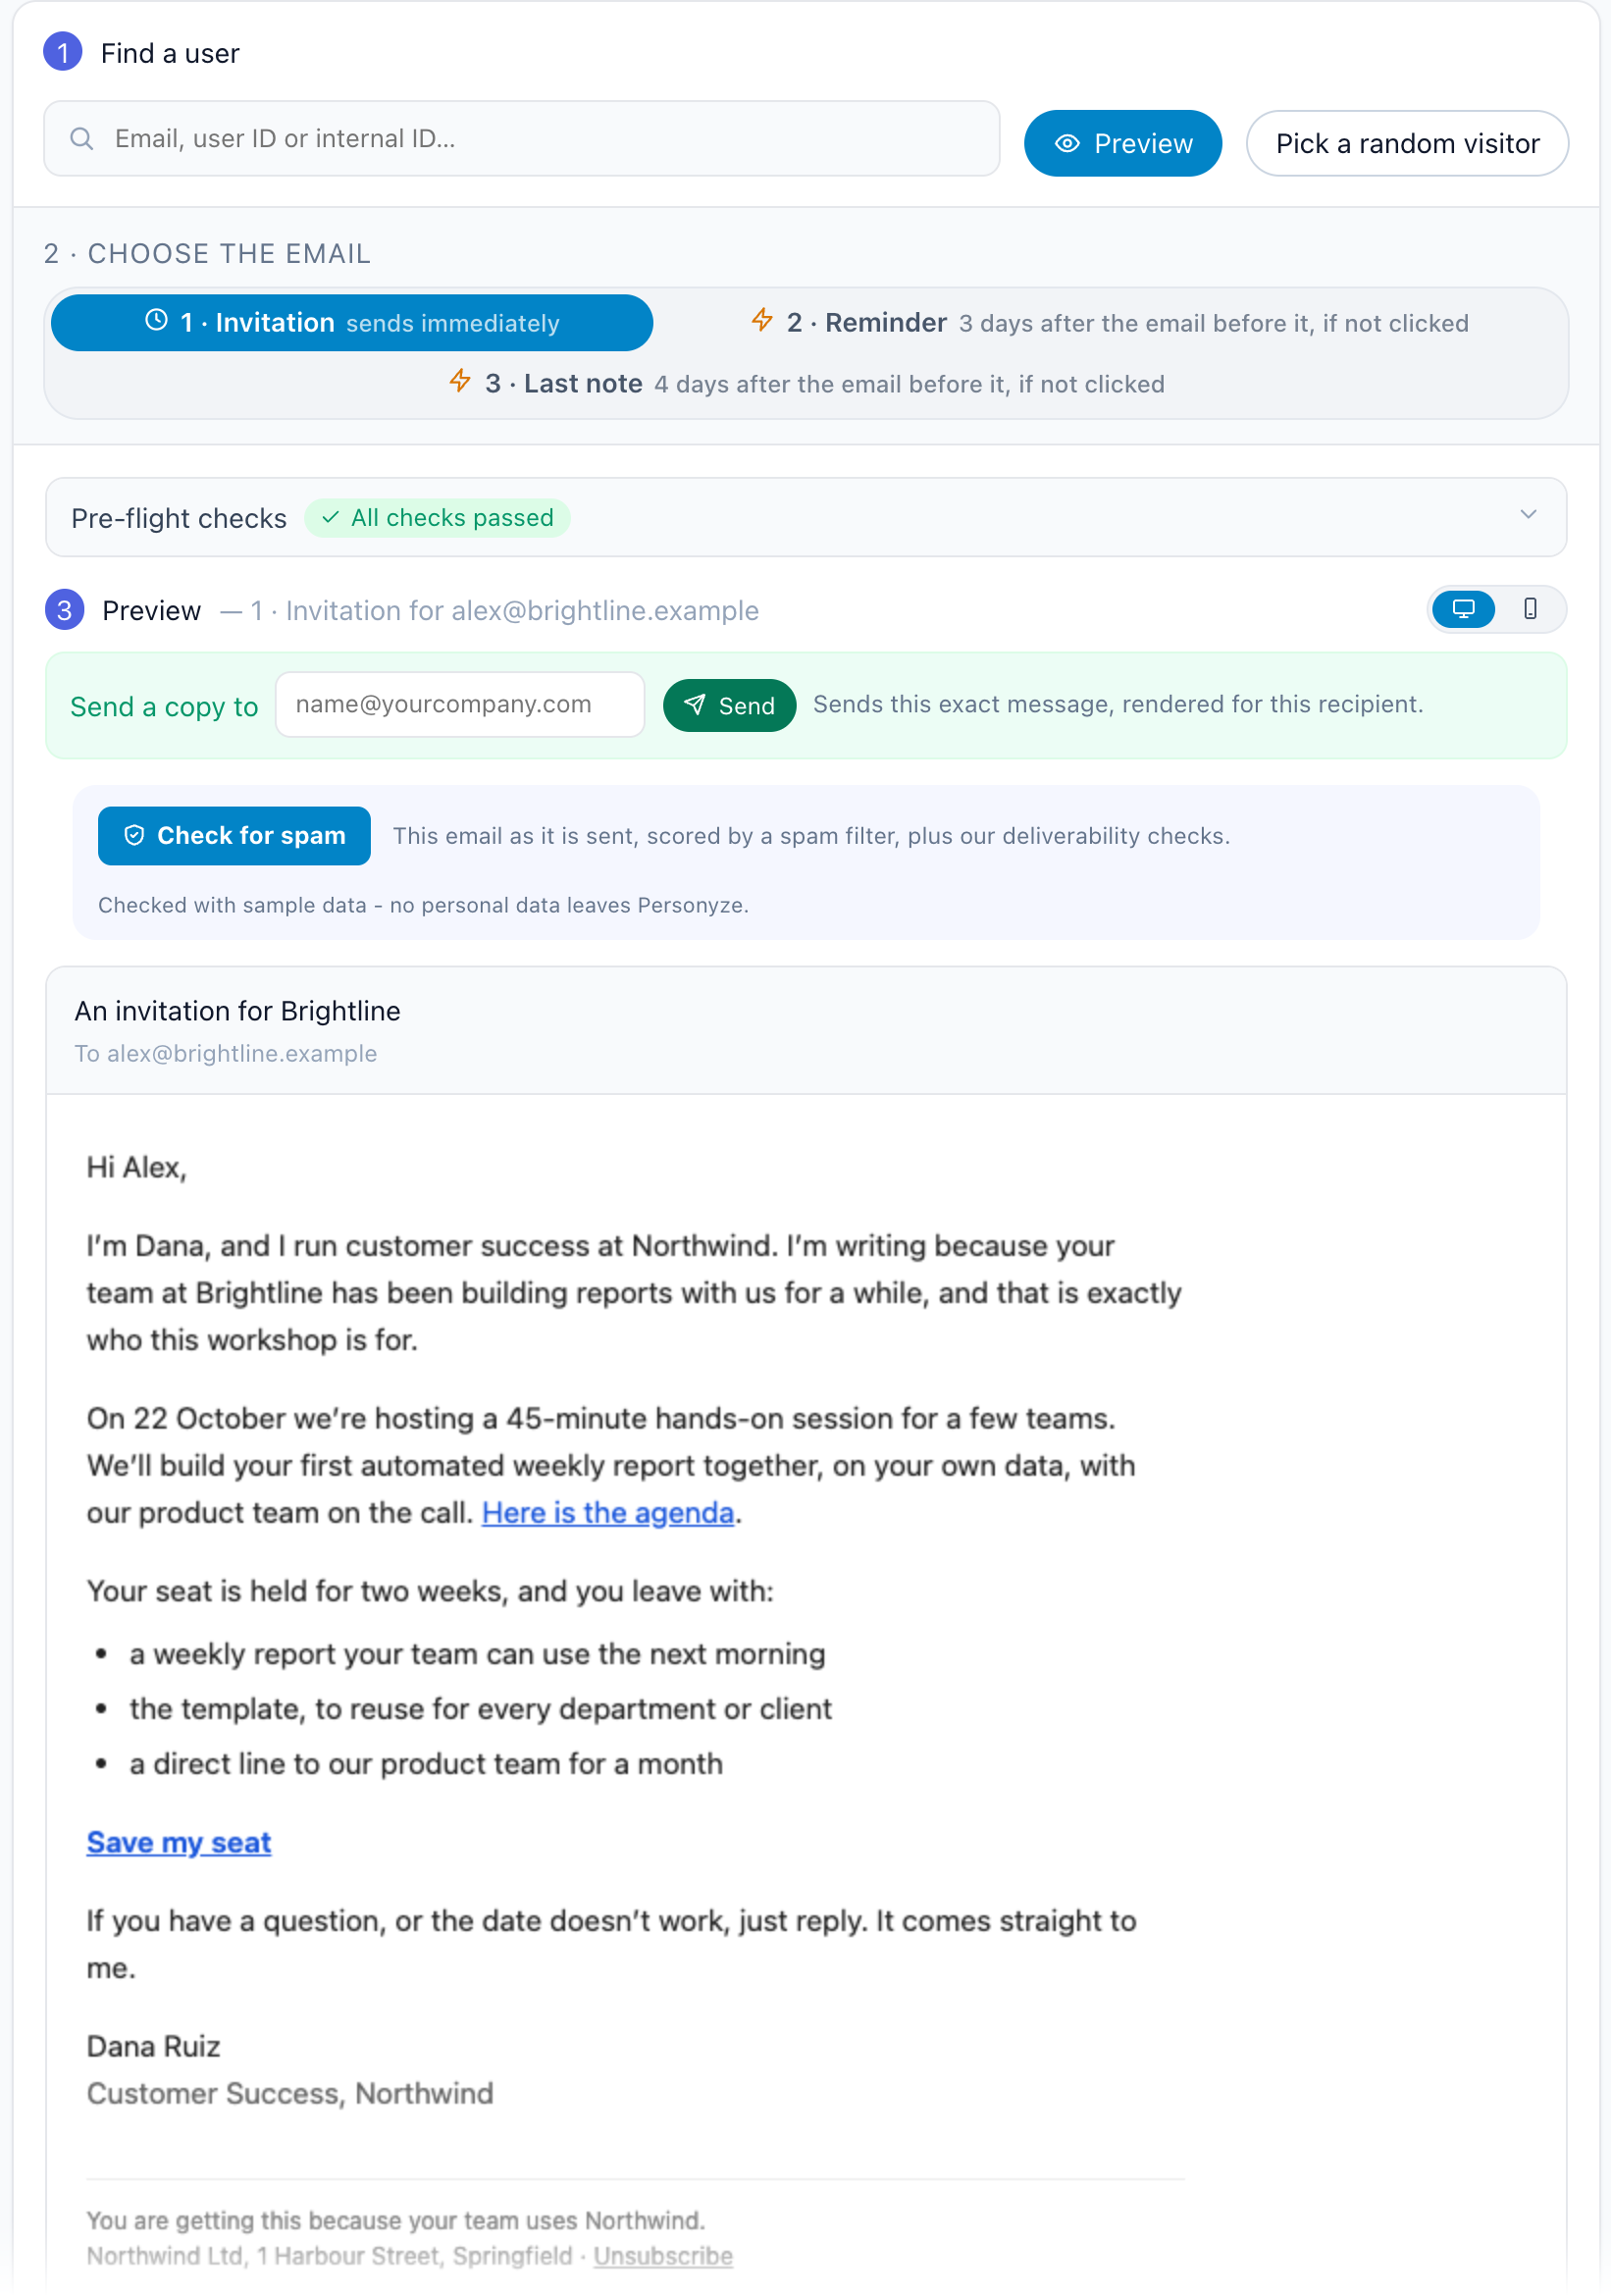
Preview by user renders any email in the sequence exactly as a chosen person will receive it, with their own name, company and personal link. Switch between the invitation and the two reminders at the top, and try people with missing fields to see the fallbacks at work. Send a copy mails that exact message to you.
Check for spam
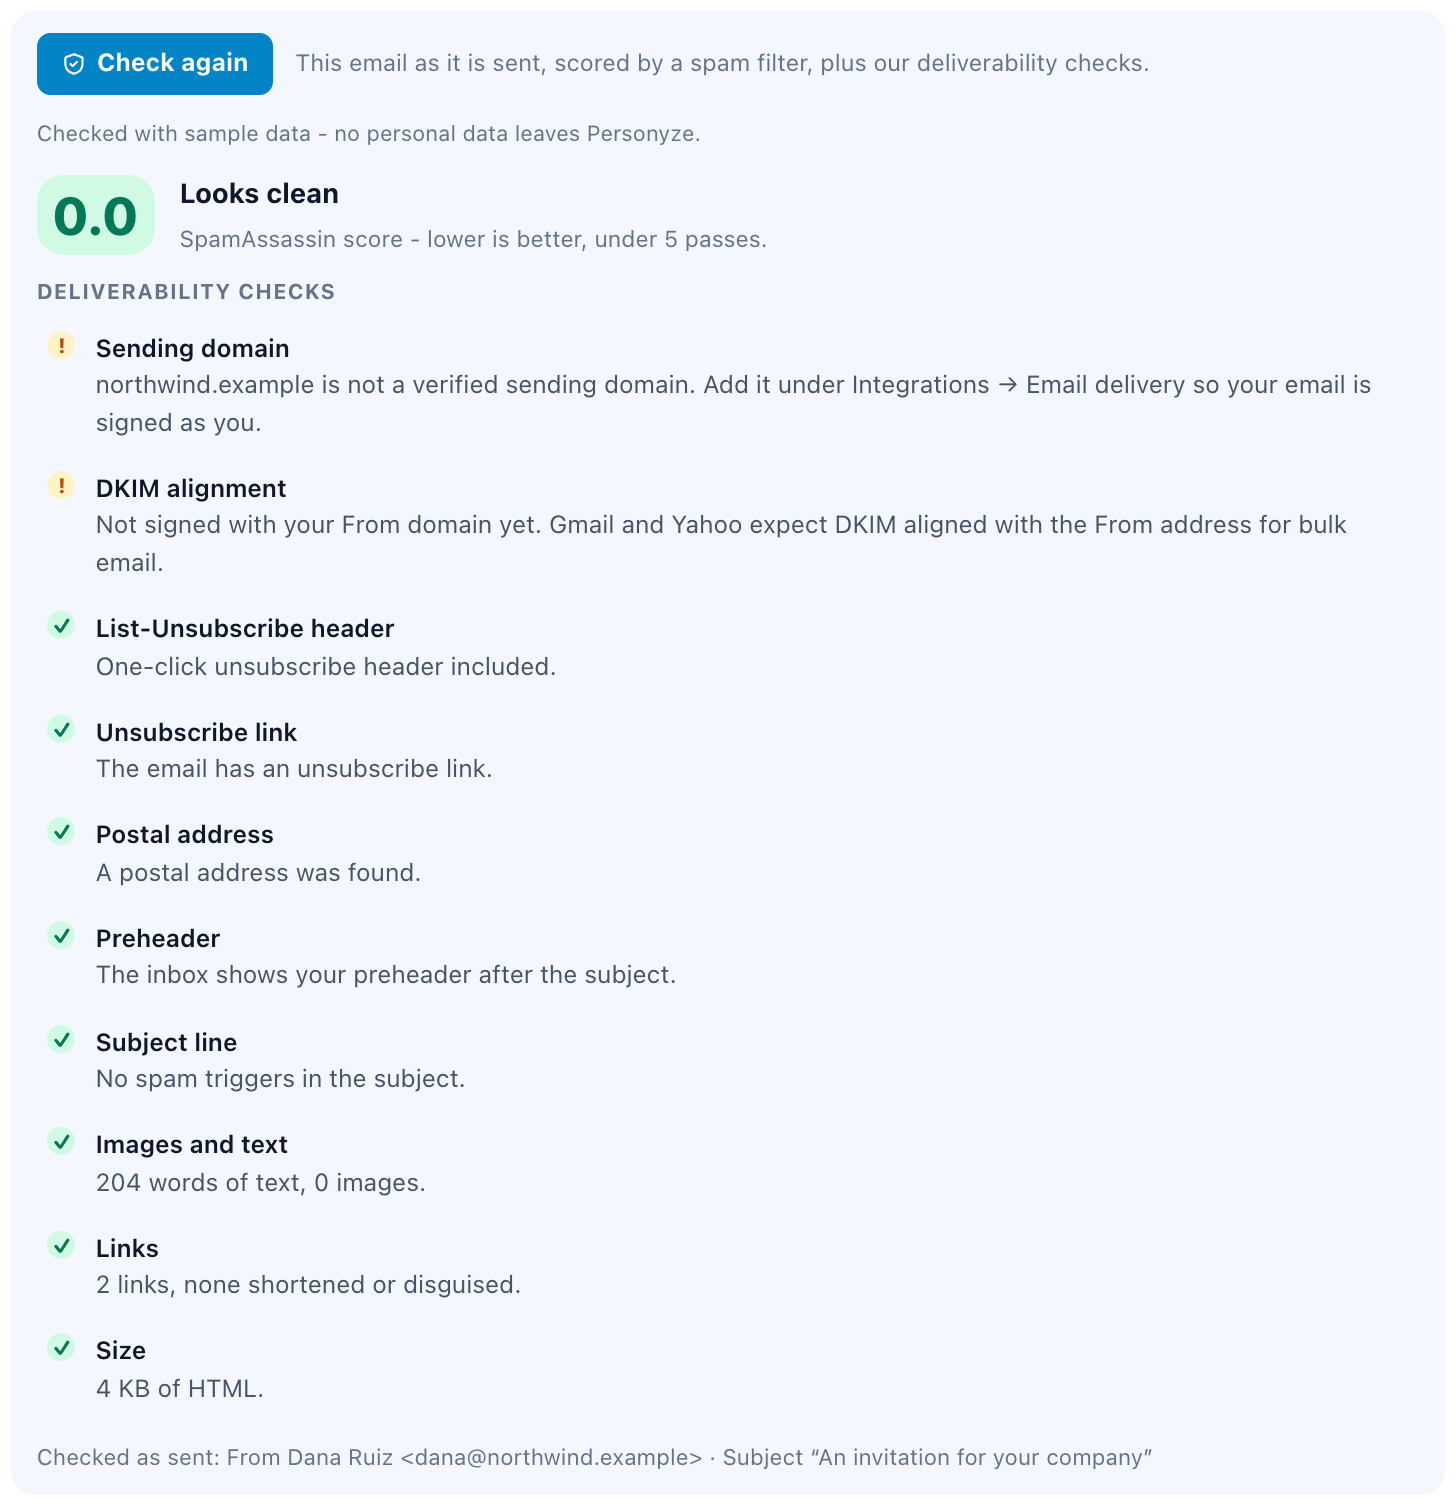
Check for spam scores the email as it will be sent with a spam filter, then runs the deliverability checks: the one-click unsubscribe header and the unsubscribe link, a postal address, the preheader, the subject, the balance of text and images, the links and the size, and whether your sending domain is verified and signed. It is checked with sample data, so no personal data leaves Personyze.
Send it to yourself first: staging mode
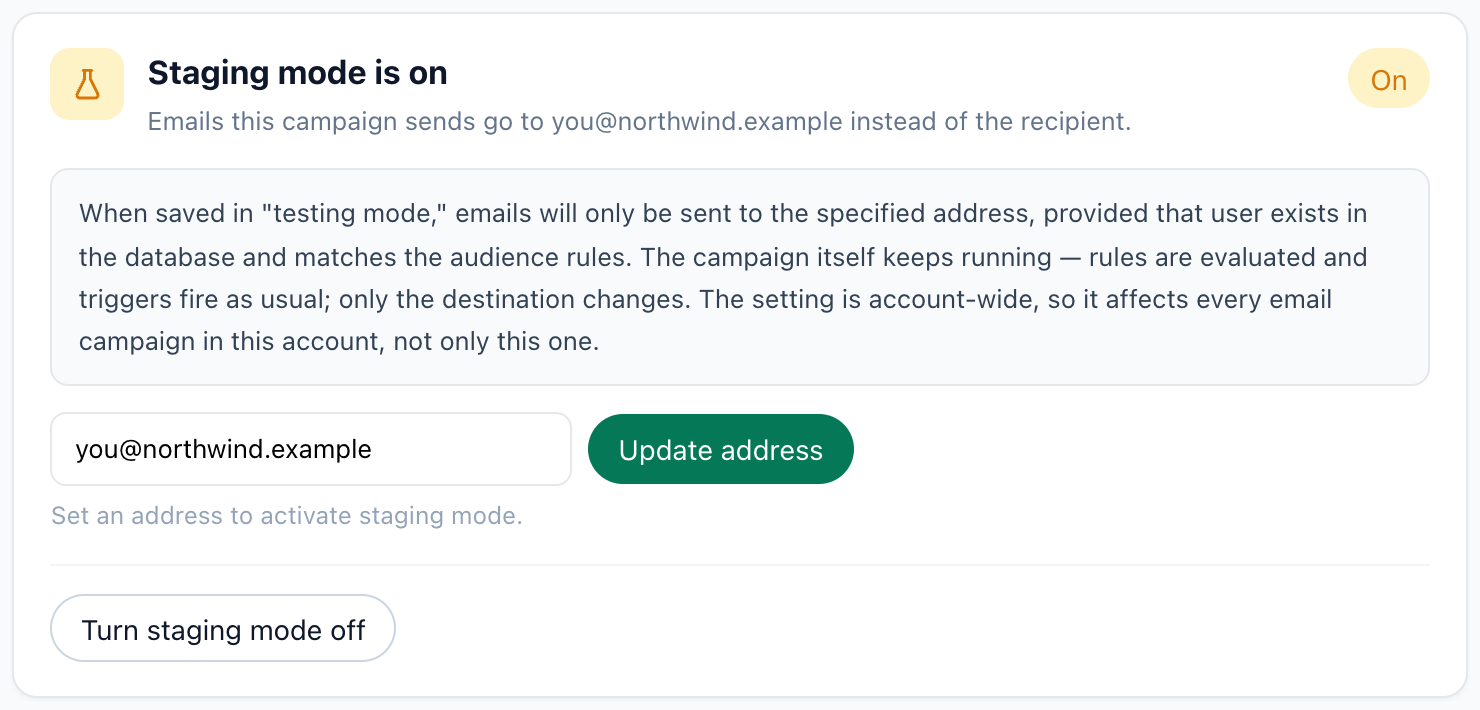
Staging mode keeps the campaign running exactly as it will — rules evaluated, waits counted, reminders triggered — but sends every email to one address of your choosing. Publish to staging and you receive the real sequence yourself, on its real schedule, before anyone else does.
Last, Sample recipients lists people who match the audience right now, with what has been sent to each. If somebody who already registered is on it, the Exclude rule needs another look.
9. Publish, and read the results
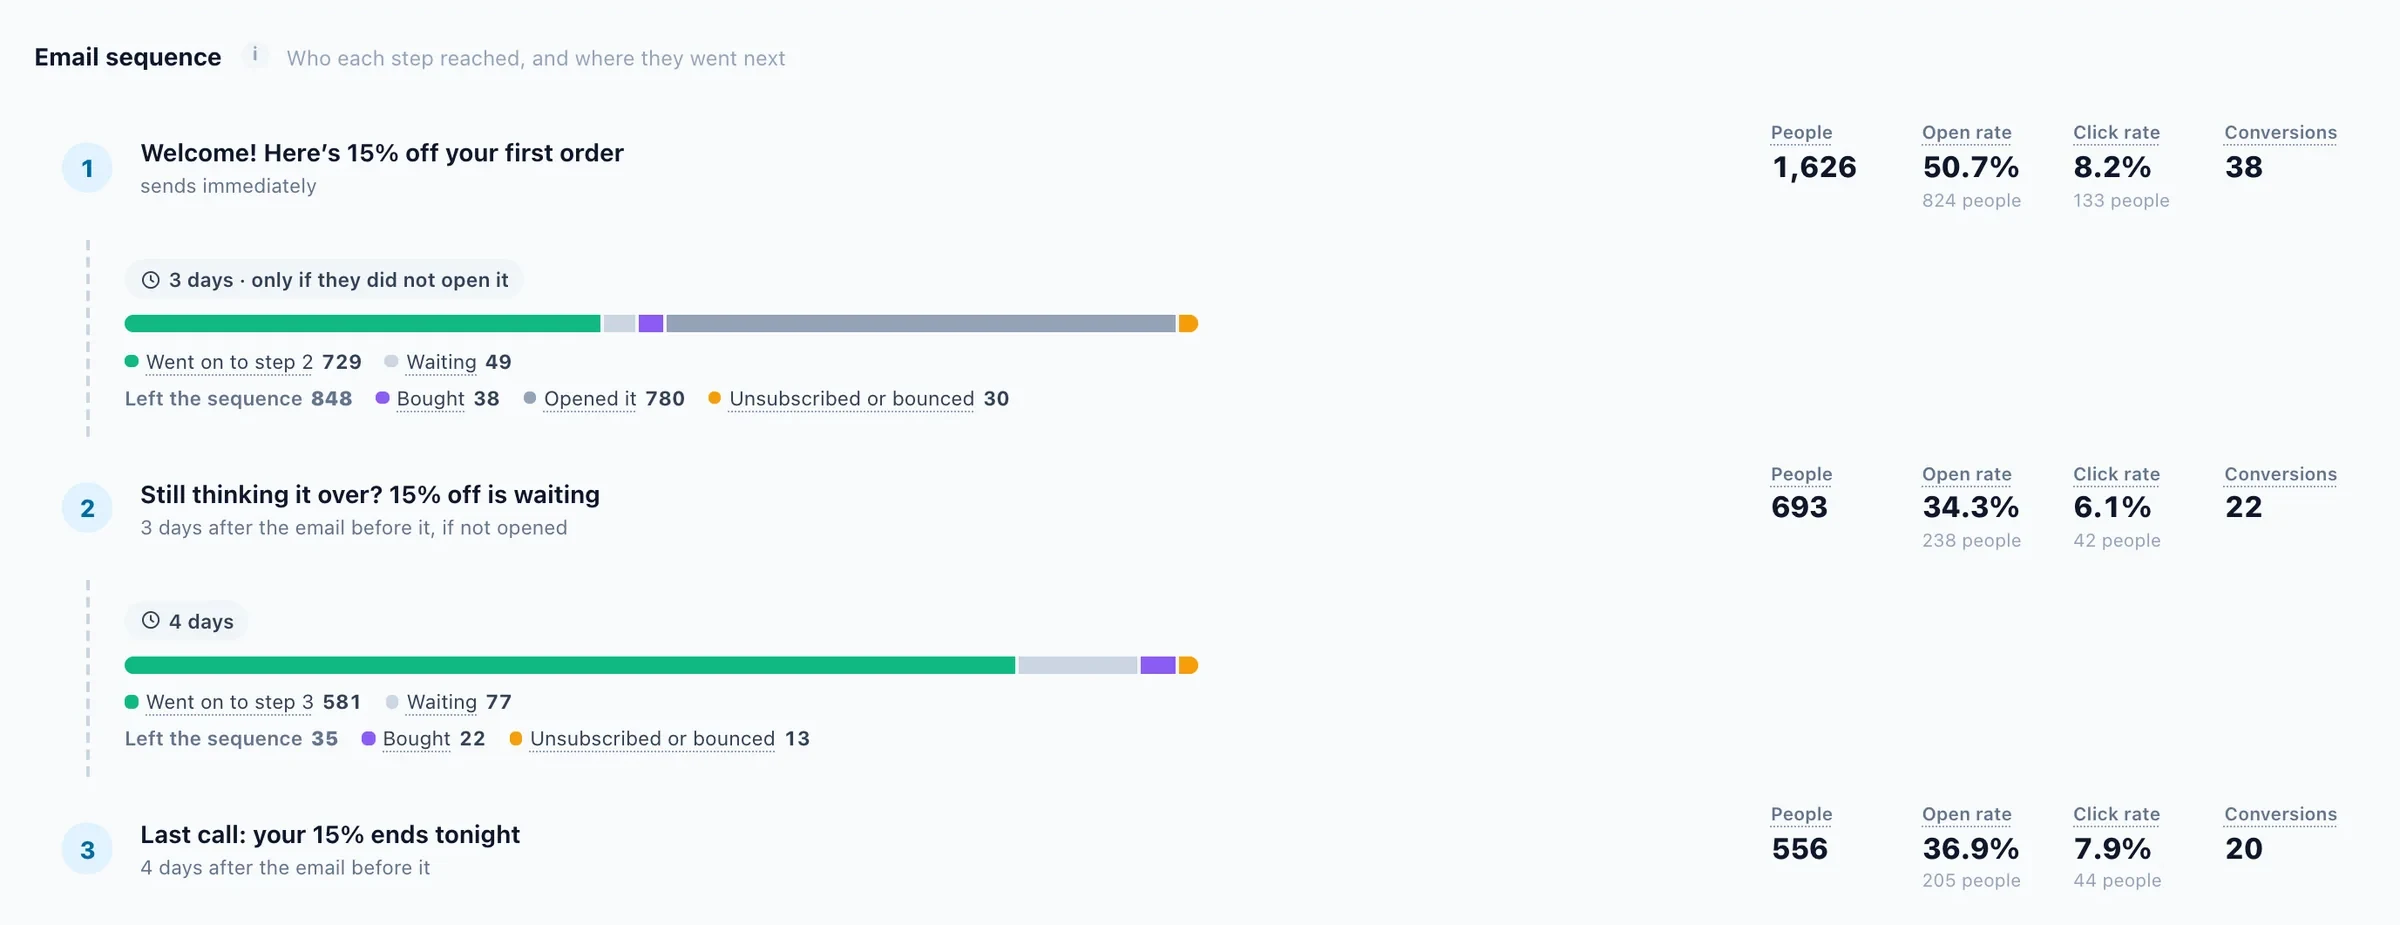
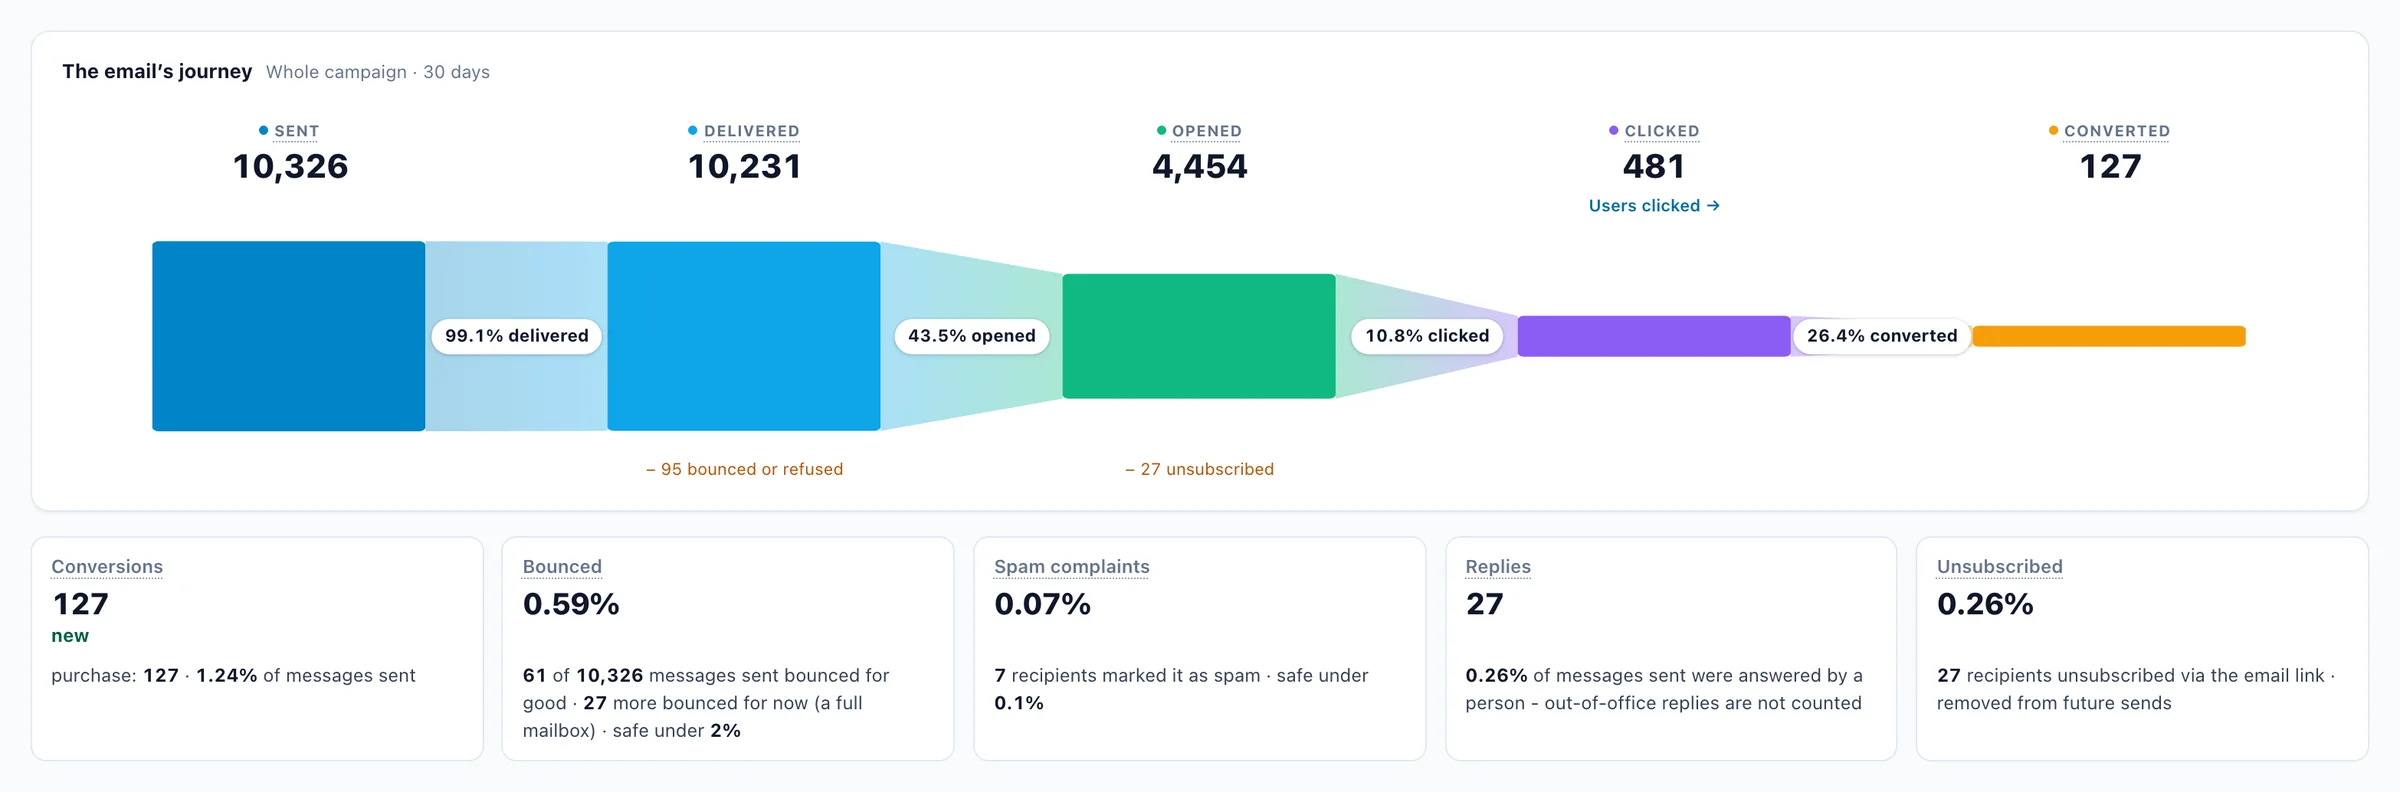
When the test run looks right, publish to live. The campaign’s Performance step then shows the sequence email by email: how many people each one reached, how many went on to the next, how many are still waiting, and how many left — because they acted, unsubscribed or bounced.
The checklist
- The list has a column for every field you will print, and one for the action you are asking for.
- Target: include the list, exclude everyone who already did it.
- A plain letter from a person, with links in the text.
- A fallback on every variable, in the subject, the preheader and the body.
- Reminders only for people who did not click, with a few days between them.
- A verified sender with a real name, Reply-To set, replies tracked.
- Not before 09:00 in each person’s time zone, on weekdays, at a gentle speed.
- Preview by user, a person with empty fields included; pre-flight checks passed; spam check clean.
- One full run to yourself in staging mode, then publish.
Questions people ask
How do I stop the reminders for people who already responded?
Two ways, and it is worth using both. Each reminder can go only to people who did not click in the email before it, and the Target step can exclude anyone whose profile already shows they did what you asked, for example a field you update when they register. The audience is checked again each time an email is due.
What happens if a field is empty for someone?
Give every variable a fallback, such as ${first_name:default('there')}. Without one, an empty field leaves a gap in the sentence. Preview by user shows the email for a person with missing fields before anyone receives it.
Can I test the whole sequence before sending it to the list?
Yes. Staging mode sends every email of the campaign to one test address, on the real schedule, with the rules evaluated as they will be when it is live. Preview by user and Send a copy show any single email for any person.
Why send it as a plain letter instead of a designed email?
An invitation from a person reads as a one-to-one note when it looks like one: plain text, a name and signature, links in the text. It is more likely to reach the main inbox, and people reply to it.
Will replies go to my inbox?
Yes. Set the Reply-To to the address you want replies to reach; with Track replies on, they are also counted in the campaign report.
Book a demo with a personalization expert
30 minutes with a personalization expert. Bring your stack, your goals, your skepticism. We'll show you what changes when every visit feels like the only one.